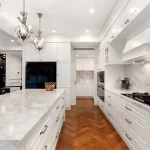
Would you like to give your kitchen an iconic and timeless look? With vintage cabinets, you can achieve this. However, restoring your vintage kitchen cabinets can be a challenging task. It takes effort and time. Also, you need to have the right tools to restore them.
In this guide, we will list the best tips and tricks to restore vintage cabinets.
-
Assessing the Cabinet Condition
Before you start to restore your vintage kitchen cabinets, check their condition. It will help in deciding what kind of restoration is important and if you can save the kitchen cabinets.
To understand the work better, look for signs of rust, water damage, mold, rot, and other kinds of damage. Look inside the kitchen cabinets, too. When you have identified the problem areas of the kitchen cabinets, you should start planning the restoration project. Take the right measurements to learn what tools and supplies you will require for the job.
Make sure that before you start with the restoration, you prepare the space by clearing any furniture. The space should have enough light to work with. Use protective gear, such as a mask and glass when working with harmful materials and sanding.
-
Removing Old Varnish or Paint
Removing old varnish or paint is the next step in restoring vintage white cabinets. It can be a little tricky. Hence, you should take your time and follow the right safety precautions.
Before starting, make sure that you have the items you require, such as gloves, chemical strippers, good airflow, and safety glasses. Begin by applying a fresh coat of chemical stripper to the cabinets using a brush.
You should also ensure that you cover the parts of the cabinets and do not allow them to dry before wiping them off with steel wool or a rag.
Once you have stripped the finish, use a moist towel for erasing any remnants. Thereafter, you have to sandpaper for smoothening out the chips in wood or rough patches.
-
Repair the Damaged Areas
It is important to repair the damaged areas of the vintage kitchen cabinets MN. Assess the damage before repairing it.
Firstly, you have to use sandpaper for smoothening out the rough edges in places that require repairs. thereafter, you will have to fill in the cracks or holes with wood putty. Allow the putty to dry completely before you continue with the project.
-
Sand and Prime the Surface
After taking care of the damaged area, you should proceed with sanding and priming. Sanding is a crucial step in preparing the surface for a fresh coat of stain or paint. With this, you will be able to create a smooth finish.
Use medium-grit sandpaper. It will get rid of the imperfections on the cabinet surface, like scratches and dents. Check every part of the cabinet, including small spaces and corners that are hard to reach.
Once you are done with the coarse sandpaper, opt for fine grit to get a more polished look. When you complete sanding, prime the cabinet. As you apply the primer, use event strokes to cover the areas of the cabinet. Allow the primer to dry before moving on.
-
Choosing the Right Stain or Paint
After sanding, choose the right stain or paint for your vintage kitchen cabinets. It helps in making sure that the cabinets last for a longer time. While choosing the right stain or paint, there are a few factors that you need to consider.
For instance, oil-based paints are the best way to go if you are looking for a glossy finish. But if you are looking for a matte finish, water-based products might be the ideal choice. Moreover, stains improve the look of natural wood grain patterns. Hence, it can create a unique look.